Recently I’ve been playing a lot of Team Fortress 2 custom maps, and thinking about the Flow of them – with a capital F because it’s a specific concept. There’s a lot of tricks that level designers use to guide players around, but one that doesn’t get talked about much is the “flow” of the level – how a blank layout by itself can direct movement. I wanted to write a guide on how to use that – this is pretty heavily TF2-focussed because I’m also using it as a tutorial at tf2maps.net, but I’ve tried to keep it reasonably applicable to other first-person games.
Soon – tomorrow or so – I’m going to write an addendum about Locomotion specifically, and try and extend the advice more broadly.
What is “Flow”?
The “flow” of a level is how it guides and drives players: how it encourages players to move through the world and where it guides them to.
When I was young, I played the Harry Potter games with my little brother. We were very keen on finding all the hidden secrets – and as such, whenever we found a route or path that obviously looked like it was heading towards the end of the level, we would avoid taking it until the last minute. We could absolutely never have said /why/ it looked like this, only that it did. Looking back, this is what the essence of Flow is: designing a level that guides players by it’s very layout.
Why is Flow Important?
The map should enable play, not block it: players should be able to make decisions like “I want to attack the point” or “i want to flank the choke” without needing to stop and plan out their precise route – or even stop and think at individual corners. A part of this is learning the map, but even before learning the map (and how many maps could you draw the layout for, from memory, right now?) players need to be able to make these choices.
Yes! You can use signs. But signs don’t work. If you watch people on maps with poor flow, you can see players happily ignoring dozens of signs. I myself spent the first few rounds as Red on Mercenary Park trying to enter an enemy spawn with a bright blue sign over it, because the flow directs me that way, and because i’m really quite dim. Signs are useful in precisely one situation, and that’s when players are already lost and actively looking for directions. Players only look for signs when the flow has completely fallen apart – they’ll happily “flow” to the wrong end of the map before noticing something’s up.
How is Flow Done?
(For this section of the guide, i’m going to use a common color scheme: solid lines are where players will actually go, while broken lines are other routes. Green is the main path you want them to take, blue is alternate valid paths, while red will lead to dead ends, get players lost, or sometimes just take them on a circuitous route with no reward for it.)
Some rules for flow:
Make Direct Routes useful
Consider the following first two images. Both are basic but reasonable layouts: each connect an entrance and a point in the same way, offering a main route to a control point and some kind of smaller flank: lets assume a balcony over the point. In both routes you want the main thrust of the attack to run through the main route, and a few flankers to take the balcony path. The difference, however, is that in one the flank is placed directly opposite the entrance and in one it is to the side. Players will, without strong signals to turn, naturally pile directly into the flank route and make their main attack through there. This could be bad for a couple of reasons. Perhaps it’s an overpowered route and you want the defense of the point to be easier. Perhaps it’s a long narrow path designed for flanking spies, and a large push down there can easily be held off – the precise reasoning doesn’t matter.

In the second picture, the green route – the one you want players to use – will indeed be most used, as players naturally flow forwards and directly into it. The third picture is the worst-case scenario. Here, the flank is designed for use by the defenders, and leads in exactly the opposite direction to where the attackers want to go – they’ll get turned round entirely, even once they’ve learned the map.
Make Sure Players Can See the Paths
The next and most important thing is that players be able to see all the routes they can take, at the point when they are making the decision. This is an issue I see a lot in newer maps, where perfectly good routes are placed in non-obvious positions (or hidden to avoid sightlines), and so players use them only when actively seeking them out. Players need to be able to identify their options to intelligently choose which to take.
Below in the first image, you can see that the shape of the room makes the flanking door practically hidden when players come through from one direction: you can see how it’s off to the side of the player’s path, and they have to make quite a sharp turn to find it. In the second, you can see how it’s much more easy to find. In the third image, perhaps the flank can’t be moved too far up: here the main route has been moved so players can turn towards it, bringing the flank into view.

The fourth image is a case of using this to hide routes: players going from A to B will almost certainly miss the alternate route, which is obvious to players going from B to A. If this path is a flank around A that only defenders can usefully use, for example, making it hard for attackers to find it without actively searching is appropriate.
Directionality
You can see this aspect in the images above, but I think it’s worth giving it some thought on it’s own: an important aspect of flow is the player’s sense of direction. This is more useful when players have a certain sense of the map’s layout already, but flow is about navigating the map, not just learning it.
If a route seems to go directly towards the destination, players will take that route. If a route seems to go perpendicular, players will expect a flank, and of course if they see a staircase going up or down, they’ll expect that route to head in that direction.
In the first image below, the middle route looks like the most direct route towards where people would expect the point to be, with the two side routes – intended as the main paths) instinctively seeming like flanks. The second picture is an attempt to solve this, with players able to easily see the direction that the central route goes (you’d probably still get players going down it as the route in the middle, but whatever).
 Lets look at a couple of case studies of specific areas.
cp_Gorge – Control Point A – Attack
Here at the first point of Gorge, the most obvious thing to take away is how gentle the turns are. Players are very rarely required to make right-angled turns (never on the main routes, occasionally on the flanks, more commonly on the red route (which is really a repurposed defensive position.)

 Here you can see the staircase up to the first point. This does require a few sharp turns, but as soon as you go through the door headed towards it, both the staircase and the wide doorway at the top are visible, and players need only deviate a little from the direct path to get there. There’s also another door to the side visible: we know it’s a flanking route because it’s a sharp turn compared to where we’re heading from and leads off to the side of where we’re headed to.

When we turn towards this door, we can easily see a short and long route around the point: even without being able to see the geography of the area, we can tell which path will take us on a longer, safer flank, and which will be shorter and more direct.

This is a picture of the same area from another entrance: you can see both paths very easily from here as well, and the staircase up to the point is even easier and more direct.
There are few truly bad routes in this area (without turning a full 180 degrees), but the path across the top is one of them: it’s useless and circuitous once the fight has moved to the point, and serves mostly as a position to defend the start from. As such it’s a useful example of a place we don’t want people to “flow” to. One route is dark and practically hidden: the other is below. As can be seen, it forces players to turn sharply 180 degrees along a path up a staircase and back in the wrong direction.

cp_Mossrock – A-B Connector
Here, in Mossrock is some excellent Flow.
This staircase is in the “connector” between the first and second control points: this image is taken facing towards the second. You can see that the staircase goes backwards over my head, towards the first: but I know that it actually loops round and comes at the second from another angle. How? Look at how the direction I’ll be moving past it compares to the direction needed to start travelling up it: I turn 90degrees first: the “line of movement” as we can see and plan it points sideways. Sure, less than a second later I’m going back in the other direction, but now I can see the next path, and how that continues to lead me perpendicular to the point.
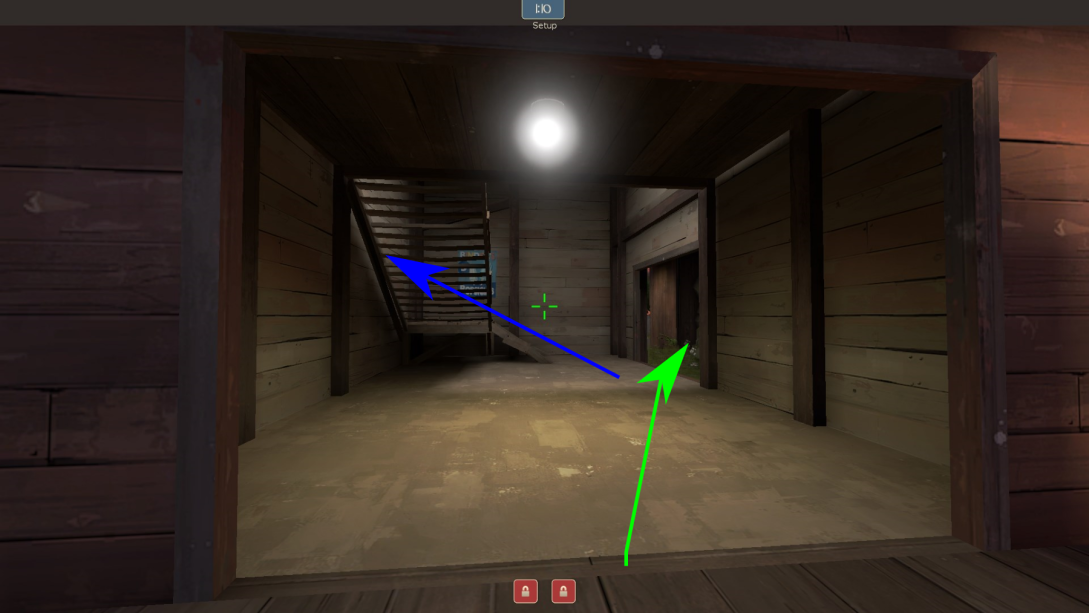
Bad Example – cp_mercenarypark A – Defense
As an example of bad flow – and of how useless signs are – look at this, the main route for defenders to the first control point – on Mercenary Park.

See how the wrong route (a locked door) is brightly lit and directly in front of the player? See how the right route is half-hidden behind crates, is darker, and requires a sharp sideways turn? Yeah. This map’s been out for a few weeks now and I still see Red players trying to go through this door, despite the massive Blue sign over it.
Hopefully this was helpful! As always, I’m interested to hear what you think of the things I write – you can get in touch with me via Discord (LeSwordfish#9782) or Twitter @LeSwordfish.
