This is one of a few blog posts adapted from my Dissertation project about Rotatris, a tetris-like game I made in Swift and SpriteKit. In Rotatris, players try to build “shells” of squares around a central rotating block. You can read my full written dissertation here.
These are some of the key algorithms for the game – it should give you an idea of my thought process when developing a game. My original dissertation has a few more, but i’ve cherry-picked some cool ones here.
Rotation
A vital part of the game is the ability to rotate the two objects – both the central block and the tetromino. The algorithm used for this is used for both rotating the central block and the tetromino, and when designing it, it was vitally important that it was intuitive to use- that objects would rotate just as the player expected them to.
Each SKNode (the basic “object” in SpriteKit) has a “position” – x and y pixel values defining their location in the local reference frame of their parent block. Position (0,0) is the centre of the parent block, and the point they should rotate around.
The most obvious option was to use the SKNode’s rotateBy action. This could rotate the object 90⁰ over a short period of time, around the SKNode’s centre of rotation – which I could set, on setup, to the corner of a square. If I locked the movement of the tetromino while the central block was rotating, they would not collide with each other mid-rotation.
This proved not to be possible. RotateBy rotates the SKNode, but the internal reference frame of the node also rotates. The squares in the block kept their internal position values, meaning that their location as stored by the SKNode did not represent their position in-game. This caused all collision functions to fail, since they were checking for collision at incorrect locations.
A new algorithm was needed. Mathematically speaking, this was obvious: when rotating a 2D shape clockwise by θ radians, each point undergoes the following transformation:
(x,y) -> ((cos(θ)x – sin(θ)y), (cos(θ)y + sin(θ)x))
When rotating by 90⁰ (pi/2 radians), cos(θ) = 0 and sin(θ) = 1, so the translation simplifies to the following:
(x,y) -> (-y,x)
Our point at (32,0) would now be at (0,32). Another rotation would take it to (-32,0), a third to (0, -32), and a fourth – as expected – back to (32,0).

However, this also failed. Because the location of the “position” of each square was in the bottom left hand corner, a shape would rotate like the above.
Note that for simplicity’s sake we are assuming each square is only a single unit long. The red square remains at (0,0), and applying the transformation above makes the other squares rotate around it. In this case the object is rotating around the centre of the red square, not its own centre and, as a consequence, it movements become unintuitive. This has a strong effect on gameplay, since players cannot instinctively predict where each square in the central block will be after rotation.
I sketched the correct rotation for a different shape, in order to see what the correct translation would need to do mathematically.
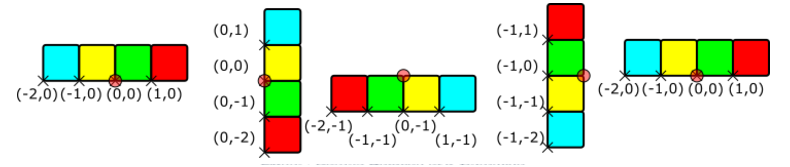 This is much more reasonable – the object rotates around (0,0) (shown by a red circle in the diagram above. If one follows the position of each square, (colour-coded above for convenience), one finds the following set of transformations:
| Start (0⁰) | 90⁰ | 180⁰ | 270⁰ | 360⁰ | |
| Blue | -2, 0 | 0, 1 | 1, -1 | -1, 1 | -2, 0 |
| Yellow | -1, 0 | 0, 0 | 0, -1 | -1, 0 | -1, 0 |
| Green | 0, 0 | 0, -1 | -1, -1 | -1, -1 | 0, 0 |
| Red | 1, 0 | 0, -2 | -2, -1 | -1, -2 | 1, 0 |
From this data, it is easy to see the required transformation. After rotating as for the first transformation above, the square should be moved down (i.e. reduced in Y) by one square. (This is particularly obvious from the two highlighted pairs). This constant reduction ensures that no single square remains at (0,0) and that the “drift” shown in the first diagram does not occur.
The final transformation is thus:
(x,y) -> (-y, x-α)
Where α is the size of a single square- for Rotatris, this is 32 pixels.
The given transformation creates an intuitive rotation that gives each block a position that accurately represents it’s location in the game world. When the player rotates either block, the algorithm runs through all child squares of the given block, and applies that transformation to their position.
Shell Assignation
Once squares have collided with the central block, they must be assigned to “shells”. This is a key aspect of the game, since the number of blocks in a “shell” determines whether or not it is removed, and certain functions require the manipulation of entire shells at once, such as shell removal and shell falldown. The concept of a shell is an easy one for a human to grasp, but proved surprisingly complex from a computational perspective.
The image on the left shows the shells as they needed to be for the game purpose. The four red squares in the middle are the centre of the block and do not change – they can be considered “shell 0”. The shells then expand outwards.
T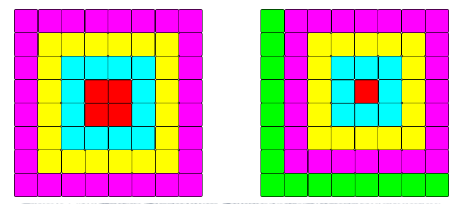 he image on the right shows the shells as a simple Chebyshev distance outward from (0,0) would calculate them. The Chebyshev Distance algorithm was the first one considered. It takes the maximum of the absolute distances in the x- and y-directions so from (0,0) to (-4,3) is 4 units in the x-axis(dX) and 3 in the y (dY) – so the Chebyshev distance is 4. It can be imagined as the movement of a king on a chessboard – 1 square in any direction, including diagonals. The Chebyshev distance can thus be considered the minimum number of turns for a king to reach the target location.
As is obvious from the image on the right, this is not suitable without modification. Since the (0,0) point is at the corner of the red square, and all squares positions are in their corners, all eight blue squares have a Chebyshev distance of 1 – yet three should be placed in shell 0, and the rest in shell 1!
The first alternate solution considered was to run the Chebyshev distance for each of the four central squares. In this case, a square’s “shell” would be the smallest of the four Chebyshev distances. This could be considered the “Four Chebyshevs” method. This idea was discarded, however – running four identical functions to get the lowest value seemed computationally inefficient, especially when it had to be run for every square.
Instead, it was felt there must be a way to determine which component of the Chebyshev distance – dX or dY – was the one that determined which shell a square was in. To investigate this, a sketch was drawn giving the position of each square.
| (-3,2) | (-2,2) | (-1,2) | (0,2) | (2,1) | (2,2) |
| (-3,1) | (-2,1) | (-1,1) | (0,1) | (1,1) | (2,1) |
| (-3,0) | (-2,0) | (-1,0) | (0,0) | (1,0) | (2,0) |
| (-3,-1) | (-2,-1) | (-1,-1) | (0,-1) | (1,-1) | (2,-1) |
| (-3,-2) | (-2,-2) | (-1,-2) | (0,-2) | (1,-2) | (2,-2) |
| (-3,-3) | (-2,-3) | (-1,-3) | (0,-3) | (1,-3) | (2,-3) |
(As before we are assuming that each square is 1 unit long/wide. The colours represent which shell we want each square to be assigned to.) Instead of keeping the absolute distance for each component, it was instead calculated which of dX or dY had the greatest absolute value, keeping the sign. This gave the following result:
| -3 | (-2,2)* | 2 | 2 | 2 | 2 |
| -3 | -2 | (-1,1)* | 1 | 1 | 2 |
| -3 | -2 | -1 | 0 | 1 | 2 |
| -3 | -2 | -1 | -1 | (1,-1)* | 2 |
| -3 | -2 | -2 | -2 | -2 | (2,-2)* |
| -3 | -3 | -3 | -3 | -3 | -3 |
Each shell now has only two numbers in, one of which is negative, and one of which is positive. The exception is those squares marked with an * – for them, both dX and dY have equivalent magnitude but different sign. It is easy to see what the case for these squares should be: take the positive number.
The application takes the two numbers given by the above and runs a case statement for both of them. 1 and -2 are shell 1, 2 and -3 are shell 2, etc. If one were to formalise this, however, one could use the following rule:
For any given square, the true value of whichever dX and dY has the highest absolute value is A.
If A >= 0, A = S
If A < 0, A – 1 = -S
Where S is the shell for the square.
A pseudocode implementation is below:
for(each square){
if( |square.x| > |square.y| ){
Set shellNum equal to square.x
} else if ( |square.x| equals |square.y| ){
Set shellNum equal to largest of square.x and square.y
} else { //|square.y| must be larger
Set shellNum equal to – (square.y – 1)
}
}
This algorithm works well – it sets the shell for the square with only 1-3 comparisons per square. This is less than that required for the Four Chebyshevs method above, which would require seven comparisons per square. (Four to find the Chebyshev distance for each square, three to compare them and find the lowest). This is over double speed per square.
Shell Collapse
The function for a shell falling down is, at heart, a simple one – move each square of the shell inwards by one square. Computationally speaking, of course, it is a bit harder. Which direction is “inwards” for a square, and how do we ascertain this from its position?
Once again the first stage was to draw a diagram, indicating where each square would fall.
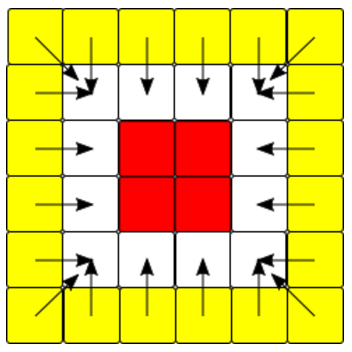 This determined eight different categories of square, which need to move in different directions.
Corners: Top Left, Top Right, Bottom Left, Bottom Right
Horizontal: Top, Bottom
Vertical: Left, Right
A corner square would be both a vertical and a horizontal, but non-corner squares would only ever be in one category.
To ascertain which category a square was in, a similar algorithm was used to that used by the shell assignation above: The difference was that this time, the algorithm knew which shell a square was in, and could find its position from that. If a square’s X-value was equivalent to the shell number, it was in the left vertical, if it’s Y-value was equivalent it was in the top horizontal, etc.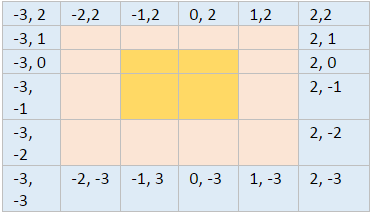
Other squares have a value of -(shell+1), which is referred to in the code as “shellOpp.” With these two numbers, it is possible to accurately determine which category a square is in, and thus instruct it which way to “fall”.
- If a square’s position is (shellOpp, shell), it is in the top left.
- If a square’s position is (shell, shell), it is in the top right.
And so on for all four corners.
Once the corners are identified, all other squares can be identified with only a single co-ordinate. In the example above if a square is not a corner and has an X value of -3, it can only be in the left-hand vertical, and so on.
This algorithm works well. It needs to run several comparisons for each square, but correctly identifies which part of the shell a square is in, and allows each square to be correctly moved into position.
Scores
An important design decision to make was how much the players should score for removing shells and squares. In accordance with the principle of challenge, players should receive higher scores for removing several shells at once than if they had removed that many shells individually. This means that more skilled players could get higher scores than players who were simply lucky or tenacious.
It was decided that the number of shells removed should act as a multiplier, meaning that players scored significantly more for removing multiple levels at once. The game scores the player as 10 * Sq * Sh, where Sq is the number of squares removed and Sh is the number of full shells removed at once. As such, to get high scores, a player should either remove outer shells with more squares, remove multiple shells at once, or both.
Combined with the fact that higher shells contain more squares, players are able to choose between several strategies, for example:
- Building out to higher shells to repeatedly remove the outermost shells for high scores,
- Repeatedly removing only the smallest shells for low scores but low risk,
- Setting up a “cascade” that will cause more than four shells to be removed at once, for very high scores but taking a long time to construct.
| Shell | Squares | Score | Cumulative Score |
| 0 | 4 | N/A | N/A |
| 1 | 12 | 120 | 120 |
| 2 | 20 | 200 | 640 |
| 3 | 28 | 280 | 1800 |
| 4 | 36 | 360 | 3840 |
| 5 | 44 | 440 | 5400 |
| 6 | 52 | 520 | 7680 |
| 7 | 60 | 600 | 10640 |
| 8 | 68 | 680 | 13340 |
| 9 | Game end | N/A | N/A |
While these strategies are available for challenges, players are under no means obliged to use them, allowing the game to also be very simple. This scoring system is stated nowhere in-game, allowing players the challenge of working it out for themselves while not providing them with information to puzzle over or potentially complicate the game for new players.
Above is a table of shells, the scores attained for removing that shell, and the scores attained for removing all shells up to that point: this indicates the sharply higher rewards available for skilled players. Note that the value does not progress linearly after the first four shells – this is because only four rows can be removed at once. Other shells will then fall down into their space, fill it up, and will be removed, but must leave some squares behind.
Speed Increase
In Tetris, the speed at which blocks drop increases over time. In classic Tetris, the speed increases every tenth tetromino that spawns: the extent to which this is mandated in the style guide is currently unknown publically. (Wikia Contributors, n.d.) In Rotatris, the speed increases every time a set of shells is removed. This is a deliberate decision for two reasons:
- Firstly, it is to fit with the goal of challenge. Newer players, who will tend to remove small shells more frequently, get the speed increased more rapidly. This means that they will play more, shorter games, and that whatever their skill level get challenged more, sooner, instead of playing very long slow games before the speed increases sufficiently to challenge them. (More experienced players building larger shells also benefit – it can take many more than ten tetrominos to complete the later shells, and forcing the speed too high while doing this frustrates, and takes away from the cerebral challenge in favour of mere quick reflexes.)
- Secondly, it is more in line with the goals of simplicity and intuitiveness. In any game, players learn things more quickly when they are tied to the player’s own actions, and so tying the speed increase to the completion of a shell means that players are more likely to notice and understand it than they would with a hidden progression as above.
Rotatris increases the speed by changing the amount of time a block “waits” before moving each step. The wait time starts at 0.65 seconds, and unlike most versions of Tetris, caps at 0.05 seconds. This means that no matter how long players play for, the game will never become unwinnable (as some versions do when the speed is too fast for blocks to reach the sides.)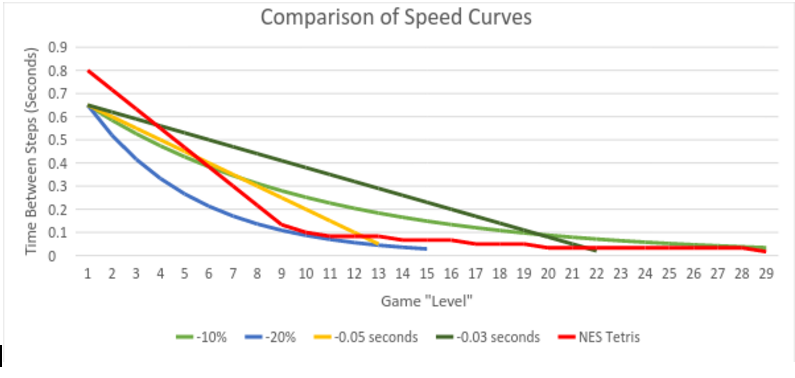 The graph above shows the speed curves for several different methods of reducing the speed that were considered. Two are exponential reductions, reducing the speed by 10% and 20% each time respectively. Two others are linear reductions, reducing the speed by 0.05 and 0.03 seconds each level respectively. Also plotted is the speed curve from the NES version of Tetris – one of the few for which a complete curve is available.
(Note that in the NES version, a “Level” occurs once every ten lines cleared instead of every one shell. A specific comparison between NES Tetris and Rotatris would be difficult due to Rotatris’s varying shell sizes and strategies, so I have not attempted one, instead comparing “Levels” directly. This may seem too abstract: however as discussed above when dealing with “challenge” I knew I wanted Rotatris to speed up faster than Tetris. With this included, I felt it was safe to “eyeball” the difference.
The NES version also measures the time in frames rather than seconds – I’ve converted it using the 60fps standard framerate that the console was reported to have.)
The 10% reduction exponential curve most closely matches the NES curve. It was visibly changing at lower levels, making it clear and easy to understand, and reduced to the minimum over the course of about thirty levels, a good number to achieve before the game’s challenge peaks. A player who can continue making even small shells for long after this number is reached is sufficiently skilled to move on to greater challenges. This is the implementation used in-game – each time a shell – or set of shells – is removed, the wait period between steps is multiplied by 0.9.
